Importing the desk settings
Copyright © 2026GotoAI Inc.Based on the goose project
About this example
The subsidy diagnosis desk takes information about a company, looks for subsidies it could apply for, and delivers a PDF diagnosis report to the requester.
| What the requester supplies | Company name and homepage URL, main industry, headcount, the expense categories the subsidy would go towards (the intended use), the planned investment, and the email address to receive the result |
| What the desk works from | The company's homepage, and the open subsidies and their application guidelines on jGrants |
| What the desk returns | A diagnosis report (PDF) with the candidate subsidies and how well each fits. It arrives through the download portal and as an email attachment |
| Roughly how long | A few to a dozen or so minutes per request, depending on the AI provider and the number of candidates |
This desk is the smallest arrangement there is: one MCP server and one skill. You import a desk that is already configured, so there is no form or skill to build from scratch.
The report this desk produces is analysis — a search of published information for subsidies a company might apply for. It is not an application service, and not the work of a licensed administrative scrivener. Whether a company is eligible is decided by each subsidy's administering office. Before applying, always check the application guidelines and the official page.
The Desk Overall Instructions and the skill both say, in as many words, not to assert eligibility and to leave anything unconfirmed marked 「要確認」 — to be checked.
The steps
| Step | What it covers |
|---|---|
| 1 | Importing the desk settings (this page) |
| 2 | Setting up the MCP server — adding the jGrants MCP server |
| 3 | Setting up email — the administrator address and the sending account |
| 4 | Checking the settings and starting the desk — choosing the AI provider and starting |
| 5 | Submitting a request — filing a request through the Web Intake Portal |
| 6 | Checking the result — the Monitor Console and the diagnosis report |
What you need
- Kari 0.7.4 or later.
- An AI provider that uses an API key. A desk will not run on a subscription (see Other settings).
- An email account that can send over SMTP. Gmail, or any mailbox with an SMTP server.
The jGrants MCP server this desk uses works against a public API, so there is no key to register. That is where it differs from the EDINET MCP server used in Example 2.
Download the settings
Download the following file.
Download the subsidy diagnosis desk settings
A .dsk file is the file type that holds an Agent Desk's settings in one piece. This one contains:
| What is in it | Details |
|---|---|
| The desk settings | Display name 「補助金診断デスク」, the Desk Overall Instructions, the extensions it uses (Python and Web Fetch), the ports, and how deliverables are sent |
| The request form | 「エージェントデスクデモ: 補助金診断依頼フォーム」 |
| The skill | 「補助金診断スキル」 — how to search for subsidies, how to narrow them down, what to weigh, and build_report.py, which lays the report out as a PDF |
What is not in it: the choice of AI provider, the email account and its password, the administrator's email address, and the MCP server itself. Those are what you set up over the following steps.
Import it
Right-click Agent Desk in the left navigation and choose Import Agent Desk from Settings….
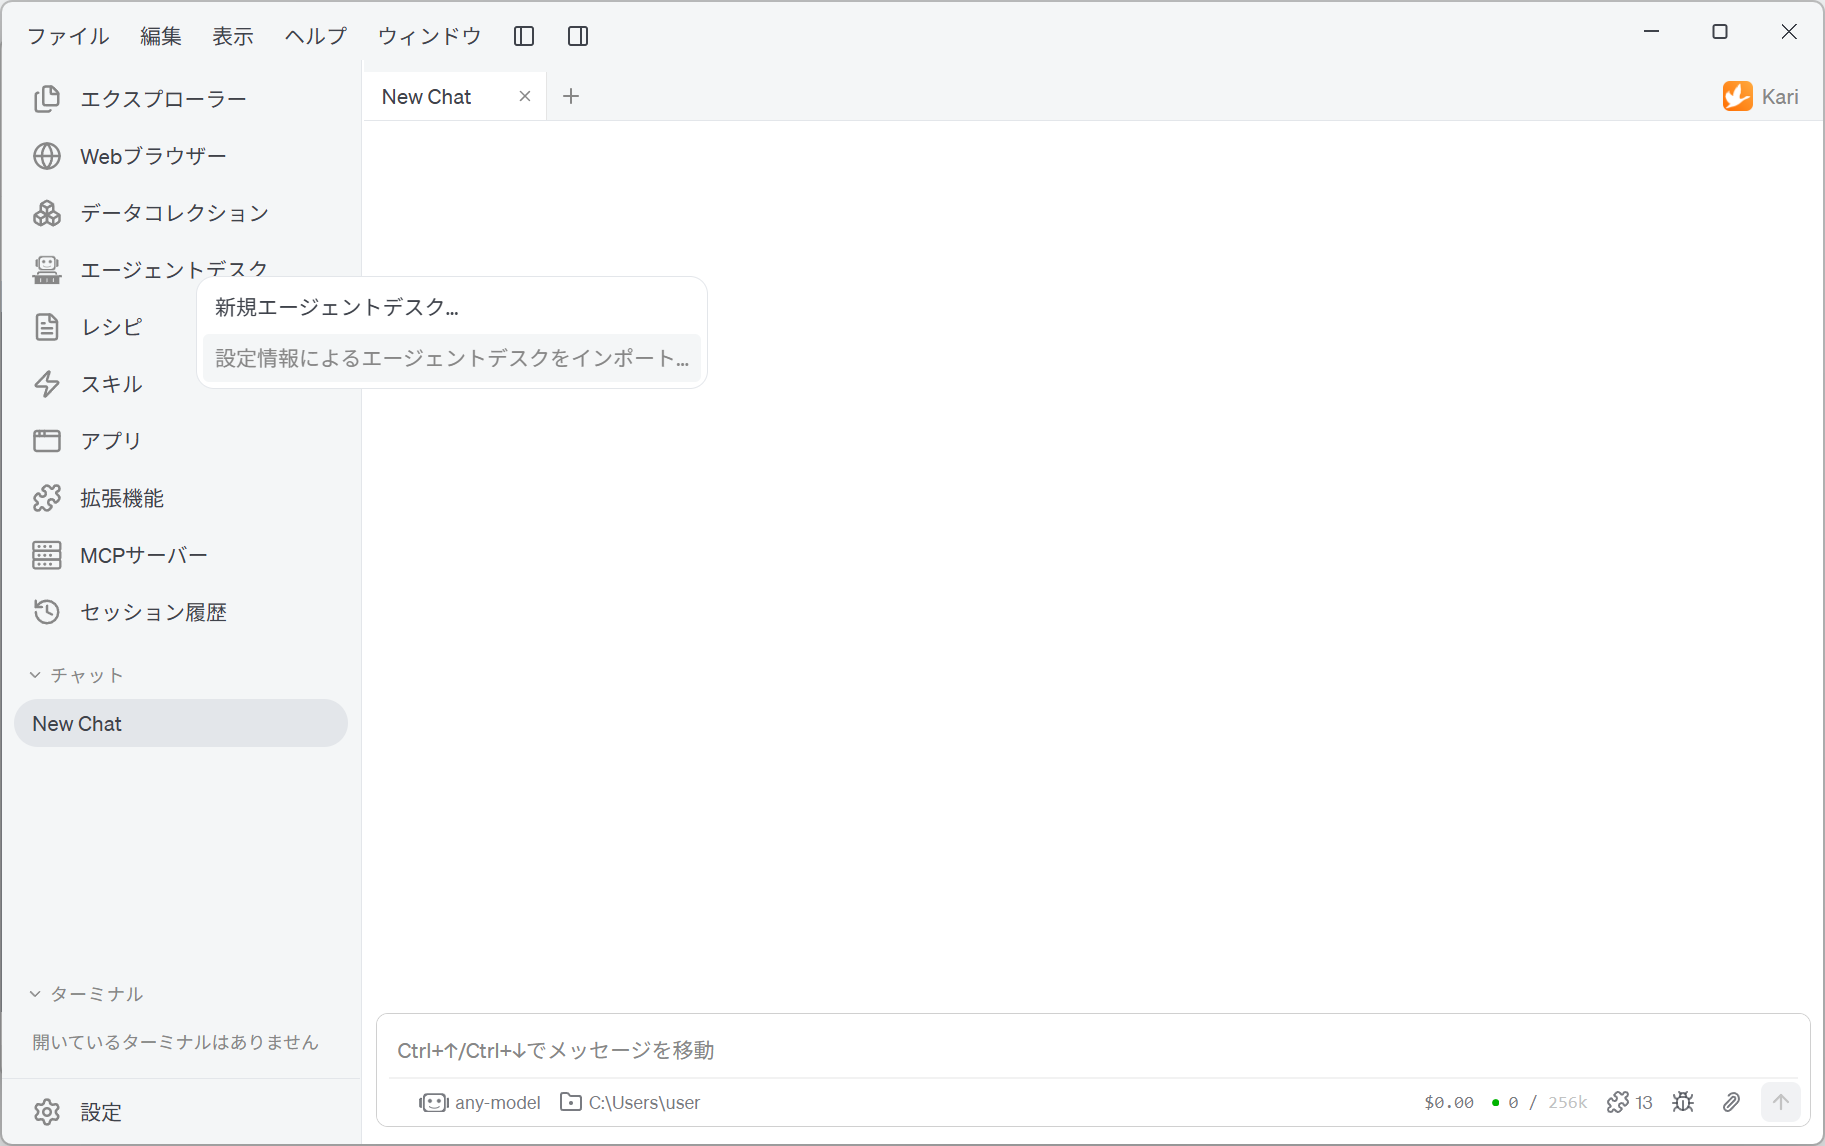
In the file dialog, pick the grants.dsk you downloaded. Once it has been read, 「補助金診断デスク」 appears in the Agent Desk list.
Straight after the import, a message tells you what still has to be set:
Before starting it, check the AI provider and model, the sending email account, the administrator's email address and the MCP servers in its settings.
This desk uses 8001 for the Web Intake Portal, 18001 for the Deliverable Download Portal and 28001 for the Monitor Console. If any of those is already taken by another desk or application, it is moved to a free number automatically and the message says so. If that happens, read the port numbers in the following steps accordingly. The actual numbers are shown under General and Inbound Channels in the desk's settings.
Next, go on to Setting up the MCP server.